Showing posts with label Installation. Show all posts

Installing ODI 11g, Weblogic, JDK on 64 Bit Windows

Download and install JRockit JDK 28.1.1 for 64 Bit Windows


You can download either the 64 Bit version of the Sun JDK or alternatively the 64 Bit version of the Jrockit JDK. For this tutorial we will be using the 64 Bit Jrockit JDK.
Install the JDK and take a note of the JDK install path (you will need this later).

Download generic Weblogic 10.3.3.

The generic WLS version does not contain any of the platform dependent files such as a specific JDK etc. It can be used to install on both 32 Bit and 64 Bit operating systems. For the difference and other details refer to How To Choose The Correct WebLogic Server (WLS) Installer For A Specific OS Hardware Architecture Bit Level (32bit-64bit) [ID 1058925.1]
java –jar wls1033_generic.jar
During the install you are asked to point Weblogic to the 64 Bit JDK.
odi_11g_install_64_bit_1
Download and install ODI generic for 64 bit
Install ODI as per documentation.
In the generic installer you are prompted for the path to the 64 Bit JDK when you launch the installer. You need to manually enter this information.
odi_11g_install_64_bit_2
ODI Studio not supported on 64 Bit.
As per note ID 1214428.1 ODI Studio is not supported on 64 Bit
You will need a 32 Bit JDK for ODI Studio.
Point Java Home for ODI Studio to 32 Bit JVM.
64 Bit ODBC drivers
If you are connecting to MS Access or MS Excel you will need ODBC 64 Bit drivers.
I could not find any standalone ODBC driver download location on the Microsoft website for these. If anyone knows of a standalone version of these please let me know.
Alternatively, you can download 64 Bit ODBC drivers from Easysoft.

Installing ODI 11g (including Agents) in High Availability (Active-Active Cluster) : Overview


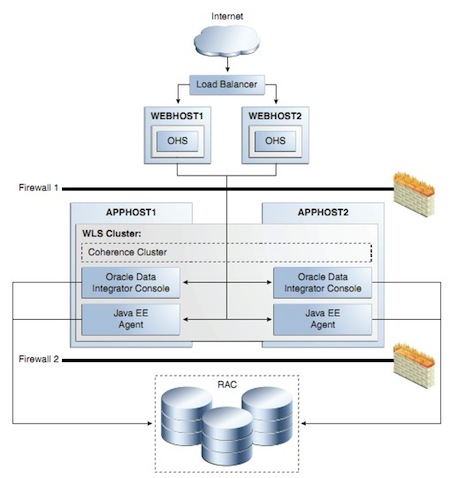
               Image from Oracle HA Guide
This post covers Oracle Data Integrator (ODI) High Availability (HA) deployment, for overview of ODI 11g components check my previous post here
ODI high availability uses WebLogic ( with Java EE Agent) which give you Load Sharing, Connection Pooling, and ability to re-start automatically using WebLogic Server.  For these reasons my personal recommendation is to move from Standalone Agent (old way of running Agents) to Java EE Agent .
Here are some key points from deploying ODI in High Availability (HA), documentation here
  • ODI in High Availability (HA) requires WebLogic and Coherence (Coherence is part of WebLogic Installer). There are three type of WebLogic Installers a) WebLogic only b) WebLogic with Coherence c) WebLogic with Coherence and OEPE (Eclipse Plug-In)  so use b or c type WebLogic Installer
  • If you are new to WebLogic Domain or WebLogic Cluster feature then first check WebLogic Domain, Managed Server, and Cluster here
  • ODI in High Availability (HA) uses WebLogic’s cluster feature (two or more managed server configured in one cluster) where ODI Java Agent run on each managed server.
  • Coherence is used enable communication among cluster members (two managed servers with Java EE Agent). Coherence cache is also used to handle scheduler life-cycle (scheduler service uniqueness and migration).
  • ODI can be configured in HA either during initial configuration (during WebLogic domain creation) or later (using extend domain feature of WebLogic)
  • Load balancer (or HTTP Server in HA) is configured to forward request to WebLogic Managed Servers (running ODI) in cluster. While defining Agents in ODI Studio, you must use Load Balancer host and port number and NOT individual managed server host/port.
.
High Level Steps to configure ODI in HA
1. Install Oracle RAC Database (this will hold Work and Master Repository Schema)
2. Run RCU to create ODI schema, more on RCU here
3.Install WebLogic on Server1 (this step will create middleware home i.e. MW_HOME)
4. Install ODI on Server1 (install this under MW_HOME), select installation type Java EE Installation
5. Repeat step 3 and 4 on Server2 (If you are intelligent like my client then used shared file system between server1 & server2, then no need to install on server2. Simply register ORACLE_HOME for ODI and oracle_common with oraInventory on server2)
6.On server1, run config.sh from $ODI_ORACLE_HOME/common/bin and select following from domain template
- Oracle Enterprise Manager Plug-in for ODI
-  Oracle Enterprise Manager Plug-in
- Oracle Data Integrator Console
- Oracle Data Integrator Agent
- Oracle JRF
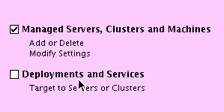
7.  When you come to screen optional configuration screen - select “Managed Server, Cluster and Machines

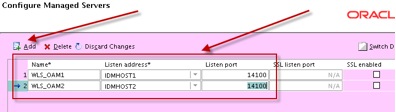
8. On managed server screen add managed server on second node (screen shown below is from my IDAM 11g book so change setting as per your server and port number)

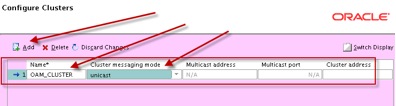
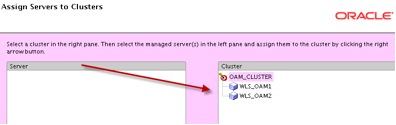
9. On cluster screen, define a cluster and add these two managed servers in cluster (screen shown below is from my IDAM 11g book  so change setting as per your requirement)


10.After domain creation, configure load balancer (or Oracle HTTP Server - OHS) to forward request to these two managed servers in cluster. If you are planning to use OHS then check steps on how to configure OHS in front of WebLogic Cluster using mod_wl_ohs here
11.Using ODI studio, create Agents in Work Repository (when prompted for hostname and port, use Load balancer or OHS host and port). Use steps mentioned here
12. Create WLS template for Java EE Agent as explained here  . This step will create jar file.
13.Create Credential Store (username password for WebLogic Server and Repository), either via Weblogic Scripting Tool (WLST) or via Enterprise Manager here  (section 2.5.3)
14.Deploy WLS template created in step 12 by running config.sh again and this time select extend domain and in domain source screen select “Base this domain on an existing template” (select jar file created in step 12)
15. Start Managed Servers (MS) i.e. first MS on server1 and second MS on server 2
16. Test ODI Agent by URL http://loadbalancerhost:loadbalancerport/oraclediagent

Oracle Data Integrator (ODI)/Sunopsis - Architecture & Installation overview

Oracle Data Integrator (ODI) is  - product from Sunopsis acquired by Oracle in 2006 and now part of Oracle Fusion Middleware Family.
1. ODI is built on E-LT(Extract , Load and Transform) Architecture.
2. Oracle Data Integrator 10g (10.1.3.5.0) suite includes three products
a) Oracle Data Integrator
b) Oracle Data Quality and
c)  Oracle Data Profiling
3. ODI uses Database as ETL (Extract, Transform & Load) engine thus eliminates requirement of proprietary ELT engine
4. Oracle Data Integrator Enterprise Edition (ODIEE) is combination of ODI (Oracle Data Integrator) and OWB (Oracle Warehouse Builder)


Oracle Data Integrator Architecture


Oracle Data Integrator (ODI) consists of following products
1. Repository - is relational Databases to store objects used/configured or developed by ODI. There are two type of Repository Master Repository (one and only one) and Work Repository (one or more)
a) Master Repository - There is only one Master repository and used to store security information, topology information (servers..) and versions of the Objects. All Modules (designer, operator, topology & security) have access to master repository.
b) Work Repository- Work related objects (project objects) are stored in Work Repository like Models, Projects and run-time information. There could be multiple work repository per installation and all linked to single master repository. Work Repository is accessed by Designer/Operator Module and run time agent.
2. Graphical Modules -
a) Designer (designer.sh|bat)- All project development takes place in this module and this is the place where database and application metadata are imported and defined.
b) Operator (operator.sh|bat) - usually to monitor production ODI instance and shows execution logs, rows processed and execution statistics
c) Topology Manager (topology.sh|bat)- To register servers, schema and agents in master repository.
d) Security Manager (security.sh|bat) - To manage user profiles and their access privileges.
3. Runtime Component / Scheduler Agent - scheduler agent coordinates execution of scenarios. Scheduler Agent retrieves code from execution repository and then requests database server, scripting engine or operating system server to execute that code.
4. Metadata Navigator (MN)- is Web (JSP/Servlet) application (available as oracledimn.war) that enables access to repository through Web Interface (Web Browser). MetaData Navigator (MN) requires Application Server and you deploy MN application oracledimn.war on pre-installed application server (Tom Cat, OAS, WebLogic). This is optional component.
.
ODI Server Installation

1. Download ODI 10.1.3.4 software from here

2.
Unzip software


3.
Start Installation using $unizp_location/ setup/ <your_os>/ Disk1/ install/ runInstaller or

$unzip_location/ setup/ <your_os>/ setup.sh for Unix or setup.exe for windows
4. Select a product to install, options are
  a) Oracle Data Integrator, Oracle Data Profiling, Oracle Data Quality
  b) Oracle Data Integrator
  c) Oracle Data Profiling
  d) Oracle Data Quality for Oracle Data Integrator
5. Select Installation Type , options are (depending on above selection)
  a) Complete - covers client and server components for ODI Suite
  b) Client - User Interfaces for ODI suite
  c) Server - run time agent for ODI, Metabase and Servers for Data Profiling and Data Quality
6. Specify Oracle Home - location to install ODI software binaries (code set)
7. Provide repository & Schedule Port and UserName password to administer Repository - This step is applicable only for option b), c) or d) from 4) Select a product to install
8. Run root.sh from root account (on Unix environment)
.
ODI Metadata Navigator Installation

Metadata Navigator (MN) is Web (JSP/Servlet) application (available as oracledimn.war) that enables access to repository through Web Interface (Web Browser). MetaData Navigator (MN) requires Application Server and you deploy MN application oracledimn.war on pre-installed application server (Tom Cat, OAS, WebLogic).
1. Install Application Server - Tomcat, OAS, WebLogic, IBM Websphere ….
2. Deploy oracledimn.war($SOFTWARE/ setup/ Manual/ oracledimn.war) to application server
3. Install JDBC Driver
4. Configure Metadata Navigator Connection to connect to your ODI repository (snps_login_work.xml)
.
What next after installation ?
1.Create mater and work repository using $ORACLE_HOME/oracledi/bin/repcreate.sh
and then access them using Topology Manager or Designer using $ORACLE_HOME/oracledi/bin/  topology.sh & designer.sh resp.