Configure ODI Master and Work Repository for deployment from DEV to SIT to UAT and finally to PROD

Create one single master repository and configure the topology in following way
- Create the physical architecture which has all your DEV/SIT/UAT/PROD servers configured. This will contain your actual data servers, schema, agents etc/
- Create the logical architecture which contain only one set of logical schema which will be use to point to different physical architecture based on the context.
- Now create diferent context say - DEV, SIT, UAT and PROD and point the logical schema to appropriate physical schema in the context mapping screen. 

ii) Create different work repository for each phase
- One schema for DEV which a development work repository and where all the design and development happens.
- Another schema for UAT which is a execution work repository where the scenarios are pushed after being successfully tested from DEV work repository
- A execution work repository in your production database which has the final tested, tried scenario from the UAT and ready for deployment into production

To deploy either we create a package to automate the workflow where scenario are generated from the UAT/DEV boxes and deployed on the PROD execution work repository using ODI tool like ODIImportObject, ODI Generatel scenarios etc.

Other way is to export the generate the scenario in DEV, export the scenario from Designer screen or command line into XML format and then import the scenario to different work repostory using command line or ODI GUI. For command line ODI has provided import/export JAVA API which you can find in the ODI Tool Reference Guide.

Configuring ODI for integrating with Hyperion Financial Management Application

Using Single-machine architecture; machine will be hosting ODI and hosting HFM and EPM foundation (Workspace and shared services). I have created a FM application named SAMPLE that is based on the “Simple Demo” information that can be found in “Hyperion\products\Financial Management\Sample Apps\Simple Demo\” of the HFM installation.

The machine is windows based as that is a pre-requisite for HFM and also the HFM client that has to be installed on the ODI machine.
The EPM version installed is 11.1.1.3
We need to perform some work around solutions for integrating ODI 11g with EPMA 11.1.1.3.

Step: 1) Go to directory C:\oracle\Middleware\Oracle_ODI1\oracledi\agent\lib Copy the HFMDriver.dll file and pest it to directory 
C:\oracle\Middleware\Oracle_ODI1\oracledi\agent\drivers


Step: 2) If you will use the “Local Agent” you will need to add the driver location to the windows environment variable (Path).
C:\oracle\Middleware\Oracle_ODI1\oracledi\agent\drivers


Once you have added the location make sure you restart all the ODI components to pick up the driver or you will continue to receive the error message.

Creating an XML Data Server


An XML Data Server corresponds to one XML file that is accessible through your local network.

XML files are accessed through the Oracle Data Integrator Driver for XML. This JDBC driver loads the XML file hierarchical structure in a relational structure in a schema stored in memory to enable SQL queries through JDBC. It is also able to unload the relational structure back in the XML File.
You must have following information:
·         The location of the DTD file associated with your XML file
·         The location of the XML file
·         The name of the Root element of your XML file

Creation of the Data Server


Step: 1) Select XML from the Technology list view. Right click and select New Data Server.


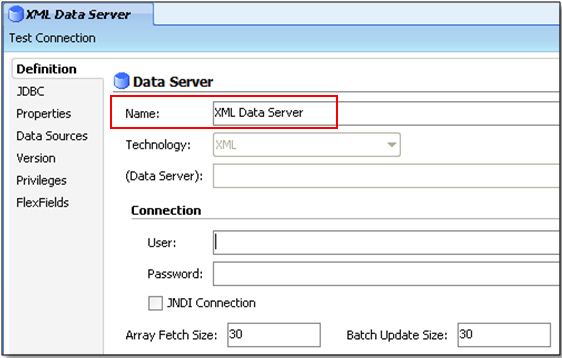
Step: 2) Fill in the following fields in the Definition tab:

·         Name: Name of the Data Server as it will appear in Oracle Data Integrator.
·         User/Password: Not used here.


Step: 3) Fill in the following fields in the JDBC tab:
                        JDBC Drivercom.sunopsis.jdbc.driver.xml.SnpsXmlDriver
                        JDBC URLjdbc:snps:xml?[property=value&property=value...]
 

JDBC Driver Properties:
 

Example:
jdbc:snps:xml?f=../xml/department.xml&re=Department_DIM&ro=false&case_sens=true&s=Depart


 Step: 4) Click test Connection button it will ask you for saving it press ‘ok’ then it will ask again for creating physical schema press ‘ok’


Creating a Physical Schema for XML

The Physical Schema will be a storage location for the tables associated with the XML file.

Step: 1) Select the appropriate XML Data Server then right-click and select New Physical Schema. The Physical Schema window will appear.


Step: 2) Name the Schema and Work Schema. Note that if you have named the schemawith the s=<schema name> property of the JDBC URL of the XML Data Server, you must use the same schema name here.


Step: 3) Save it.
 

Creating a Logical Schema for XML


Logical Schema can be associated with only one Physical Schema in a given Context.

Creating Model for XML:

Step: 1) Select Model tab in designer Navigator and select New model.


 Step: 2) In Definition Tab Specify the following details.


Step: 3) Perform the reverse Engineering


Oracle Data Integrator 11g Knowledge Modules Description


RKM Oracle 

Reverse-engineers tables, views, columns, primary keys, non unique indexes and foreign keys.

JKM Oracle 10g Consistent (Streams)

Creates the journalizing infrastructure for consistent set journalizing on Oracle 10g tables, using Oracle Streams.

JKM Oracle 11g Consistent (Streams)

Creates the journalizing infrastructure for consistent set journalizing on Oracle 11g tables, using Oracle Streams.

JKM Oracle Consistent
Creates the journalizing infrastructure for consistent set journalizing on Oracle tables using triggers.


JKM Oracle Consistent (Update Date)
Creates the journalizing infrastructure for consistent set journalizing on Oracle tables using triggers based on a Last Update Date column on the source tables.


JKM Oracle Simple


Creates the journalizing infrastructure for simple journalizing on Oracle tables using triggers.


JKM Oracle to Oracle Consistent (OGG)


Creates and manages the ODI CDC framework infrastructure when using Oracle GoldenGate for CDC. See Chapter 26, "Oracle GoldenGate" for more information.


CKM Oracle


Checks data integrity against constraints defined on an Oracle table.


LKM File to Oracle (EXTERNAL TABLE)


Loads data from a file to an Oracle staging area using the EXTERNAL TABLE SQL Command.


LKM File to Oracle (SQLLDR)


Loads data from a file to an Oracle staging area using the SQL*Loader command line utility.


LKM MSSQL to Oracle (BCP SQLLDR)


Loads data from a Microsoft SQL Server to Oracle database (staging area) using the BCP and SQL*Loader utilities.


LKM Oracle BI to Oracle (DBLINK)


Loads data from any Oracle BI physical layer to an Oracle target database using database links. See Chapter 17, "Oracle Business Intelligence Enterprise Edition" for more information.


LKM Oracle to Oracle (DBLINK)


Loads data from an Oracle source database to an Oracle staging area database using database links.


LKM Oracle to Oracle (datapump)


Loads data from an Oracle source database to an Oracle staging area database using external tables in the datapump format.


LKM SQL to Oracle


Loads data from any ANSI SQL-92 source database to an Oracle staging area.


LKM SAP BW to Oracle (SQLLDR)


Loads data from SAP BW systems to an Oracle staging using SQL*Loader utilities. See the Oracle Fusion Middleware Application Adapters Guide for Oracle Data Integrator for more information.


LKM SAP ERP to Oracle (SQLLDR)


Loads data from SAP ERP systems to an Oracle staging using SQL*Loader utilities. See the Oracle Fusion Middleware Application Adapters Guide for Oracle Data Integrator for more information.


IKM Oracle AW Incremental Update


Integrates data in an Oracle target table in incremental update mode and is able to refresh a Cube in an Analytical Workspace. See Chapter 21, "Oracle OLAP" for more information.


IKM Oracle Incremental Update


Integrates data in an Oracle target table in incremental update mode.

IKM Oracle Incremental Update (MERGE)


Integrates data in an Oracle target table in incremental update mode, using a MERGE statement.


IKM Oracle Incremental Update (PL SQL)


Integrates data in an Oracle target table in incremental update mode using PL/SQL.

IKM Oracle Multi Table Insert
Integrates data from one source into one or many Oracle target tables in append mode, using a multi-table insert statement (MTI).


IKM Oracle Slowly Changing Dimension

Integrates data in an Oracle target table used as a Type II Slowly Changing Dimension.

IKM Oracle Spatial Incremental Update

Integrates data into an Oracle (9i or above) target table in incremental update mode using the MERGE DML statement. This module supports the SDO_GEOMETRY datatype.

IKM Oracle to Oracle Control Append (DBLINK)

Integrates data from one Oracle instance into an Oracle target table on another Oracle instance in control append mode.
This IKM is typically used for ETL configurations: source and target tables are on different Oracle instances and the interface's staging area is set to the logical schema of the source tables or a third schema.

SKM Oracle

Generates data access Web services for Oracle databases. See "Working with Data Services" in the Oracle Fusion Middleware Developer's Guide for Oracle Data Integrator for information about how to use this SKM.

Creating an Excel Data Server


Prepare your Excel spreadsheet

First open up a Microsoft Excel spreadsheet, we will need to define a named range.
 
Step: 1) Open spreadsheet


Step: 2) Select Formulas-->Define Name


Step: 3) Select the range for the data


Define an ODBC Data Source

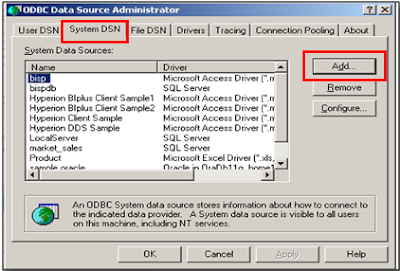
Step: 1) ODI will use an ODBC connection to natively access Microsoft Excel. Select start-->Administrative Tools-->data Source (ODBC)


Step: 2) click on Add select the Excel Driver press ‘Finish’. Specify the data source Name and description. Click on ‘Select Workbook’


Step: 3) Specify the Excel file path Press ok. You should now see your new ODBC Data Source listed in the ODBC Data Source Administrator.


Create a Data Server in Topology Manager

Step: 1) Open up Topology Manager and go to Physical Architecture. Right click on the Microsoft Excel technology and select New Data Server. In the Data Serverwindow enter a name in the Name field.


Step: 2) Go to the JDBC tab. Select the Sun JDBC-ODBC Bridge in the JDBC DriverList. 


Step: 3) In the JDBC URL template replace <odbc_dsn_alias> with the name of the ODBC Data Source you specified earlier. I used Excel data Server in this example.


 Step: 4) Click on Test and make sure you get a successful connection.


Click OK.

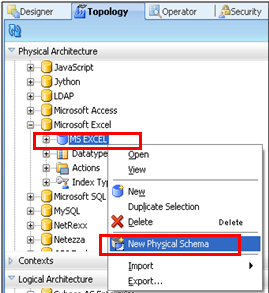
Step: 5) Go to Newly created data server and Right click select New Physical Schema 


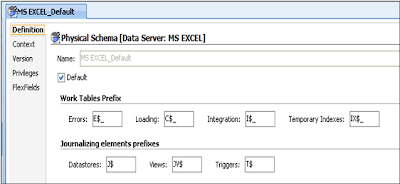
Step: 6) Verify newly created Physical Schema.


Create New Logical Schema:

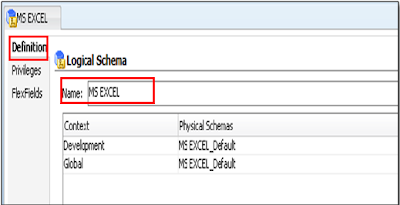
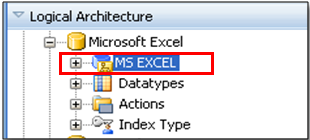
Step: 1) Select Microsoft Excel in Logical Architecture tab Right click and select new logical schema. Specify the name and map it with Contexts.


Create Model for Excel

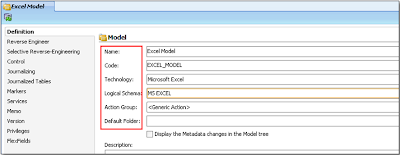
Step: 1) Go to the Designer Navigator select model tab and create new model for excel.


Step: 2) Specify the Name, Technology and Logical schema.


Step: 3) Select Reverse Engineering Tab. Select system table check box and go to Selective reverse Engineering tab.

 
Step: 4) Here select Selective reverse Engineering and Objects to reverse Engineering check boxes.

 
Step: 5) Save it and perform reverse Engineer of this model.

 
Step: 6) Right click on data store select View data.

 Done !